<?xml version="1.0" encoding="utf-8"?><feed xmlns="http://www.w3.org/2005/Atom" ><generator uri="https://jekyllrb.com/" version="4.4.1">Jekyll</generator><link href="https://rambalachandran.github.io/feed.xml" rel="self" type="application/atom+xml" /><link href="https://rambalachandran.github.io/" rel="alternate" type="text/html" /><updated>2026-11-03T19:44:34+10:30</updated><id>https://rambalachandran.github.io/feed.xml</id><title type="html">Ram Balachandran</title><subtitle>Ram Balachandran, PhD - Chief Data Scientist building AI solutions for physical systems: water networks, energy, and industrial assets.</subtitle><author><name>Janakiraman (Ram) Balachandran</name><email>ram@naavil.com</email></author><entry><title type="html">Git Pre-Commit Hooks for Linting and Styling SQL Codes</title><link href="https://rambalachandran.github.io/blog/Git_Hooks_PreCommit/" rel="alternate" type="text/html" title="Git Pre-Commit Hooks for Linting and Styling SQL Codes" /><published>2023-03-01T00:00:00+10:30</published><updated>2023-03-01T00:00:00+10:30</updated><id>https://rambalachandran.github.io/blog/Git_Hooks_PreCommit</id><content type="html" xml:base="https://rambalachandran.github.io/blog/Git_Hooks_PreCommit/"><![CDATA[<p>Git hooks are a simple, easy way to do small local scripting to improve code quality and readability. Using consistent git hooks across projects can reduce the load on CI/CD process which can focuse more on unit and integration testing.</p>

<h2 id="pre-commit">Pre-commit</h2>
<p>A pre-commit git hook is a shell file located inside the git repository in the following location
 <code class="language-plaintext highlighter-rouge">.git/hooks/pre-commit</code>. Infact, when you create a git repository, a sample file is available at <code class="language-plaintext highlighter-rouge">.git/hooks/pre-commit.sample</code>. In this blog, we will look at how to use pre commit hook to automatically format and lint python and SQL code.</p>

<h2 id="sqlfluff">SQLFluff</h2>
<p><a href="https://github.com/sqlfluff/sqlfluff">sqlfluff</a> is a python base formatter and linter for SQL files that is used in most dbt-sql models. The configuration of the sqlfluff can be achieved by updating the <code class="language-plaintext highlighter-rouge">pyproject.toml</code> a configuration format supported by python. The configuration corresponding to <code class="language-plaintext highlighter-rouge">sqlfluff</code> for <code class="language-plaintext highlighter-rouge">bigquery</code> in <code class="language-plaintext highlighter-rouge">dbt</code> is as follows,</p>

<div class="language-toml highlighter-rouge"><div class="highlight"><pre class="highlight"><code><span class="k">[</span><span class="n">tool</span><span class="k">.</span><span class="n">sqlfluff</span><span class="k">.</span><span class="n">core</span><span class="k">]</span>
<span class="n">templater</span> <span class="o">=</span><span class="w"> </span><span class="s">"jinja"</span>
<span class="n">dialect</span> <span class="o">=</span><span class="w"> </span><span class="s">"bigquery"</span>
<span class="c"># sql_file_exts = .sql,.sql.j2,.dml,.ddl</span>

<span class="k">[</span><span class="n">tool</span><span class="k">.</span><span class="n">sqlfluff</span><span class="k">.</span><span class="n">rules</span><span class="k">]</span>
<span class="n">comma_style</span> <span class="o">=</span><span class="w"> </span><span class="s">"leading"</span>
<span class="n">tab_space_size</span> <span class="o">=</span><span class="w"> </span><span class="mi">4</span>
<span class="n">max_line_length</span> <span class="o">=</span><span class="w"> </span><span class="mi">80</span>

<span class="k">[</span><span class="n">tool</span><span class="k">.</span><span class="n">sqlfluff</span><span class="k">.</span><span class="n">indentation</span><span class="k">]</span>
<span class="n">indented_joins</span> <span class="o">=</span><span class="w"> </span><span class="kc">false</span>
<span class="n">indented_using_on</span> <span class="o">=</span><span class="w"> </span><span class="kc">true</span>
<span class="n">template_blocks_indent</span> <span class="o">=</span><span class="w"> </span><span class="kc">false</span>

<span class="k">[</span><span class="n">tool</span><span class="k">.</span><span class="n">sqlfluff</span><span class="k">.</span><span class="n">templater</span><span class="k">]</span>
<span class="n">unwrap_wrapped_queries</span> <span class="o">=</span><span class="w"> </span><span class="kc">true</span>

<span class="k">[</span><span class="n">tool</span><span class="k">.</span><span class="n">sqlfluff</span><span class="k">.</span><span class="n">templater</span><span class="k">.</span><span class="n">jinja</span><span class="k">]</span>
<span class="n">apply_dbt_builtins</span> <span class="o">=</span><span class="w"> </span><span class="kc">true</span>
</code></pre></div></div>
<h2 id="formatting-and-linting-with-sqlfluff">Formatting and Linting with SQLFluff</h2>
<p>To format sql code before commit, you need to get a list of SQL files that are staged for commit. This script assumes, all your sql files end with <code class="language-plaintext highlighter-rouge">*.sql</code>. However, its simple to change the script if you have any other custom file extension.</p>

<div class="language-sh highlighter-rouge"><div class="highlight"><pre class="highlight"><code><span class="c"># Get the list of SQL files staged to be committed</span>
<span class="nv">sql_files</span><span class="o">=</span><span class="si">$(</span>git diff <span class="nt">--cached</span> <span class="nt">--name-only</span> <span class="nt">--diff-filter</span><span class="o">=</span>ACM | <span class="nb">grep</span> <span class="s1">'\.sql$'</span><span class="si">)</span>
</code></pre></div></div>
<p>Once you get the list of staged files, you can iterate over the list of files and fix them as given below</p>

<div class="language-sh highlighter-rouge"><div class="highlight"><pre class="highlight"><code><span class="c"># fix sql files with sqlfluff</span>
<span class="k">for </span>file <span class="k">in</span> <span class="nv">$sql_files</span>
<span class="k">do
    </span>sqlfluff fix  <span class="s2">"</span><span class="nv">$file</span><span class="s2">"</span>
<span class="k">done</span>
</code></pre></div></div>
<p>Upon formatting and fixing SQL files, they need to be staged again for commit</p>

<div class="language-sh highlighter-rouge"><div class="highlight"><pre class="highlight"><code><span class="c"># stage files again with extension .sql</span>
git add <span class="nt">-u</span> <span class="s1">'*.sql'</span>
</code></pre></div></div>
<p>Once staged, the sql code needs to be linted again for any errors.</p>

<div class="language-sh highlighter-rouge"><div class="highlight"><pre class="highlight"><code><span class="k">for </span>file <span class="k">in</span> <span class="nv">$sql_files</span>
<span class="k">do
    </span>sqlfluff lint  <span class="s2">"</span><span class="nv">$file</span><span class="s2">"</span>
    <span class="k">if</span> <span class="o">[</span> <span class="nv">$?</span> <span class="nt">-ne</span> 0 <span class="o">]</span><span class="p">;</span> <span class="k">then
        </span><span class="nb">echo</span> <span class="s2">"sqlfluff found errors in </span><span class="nv">$file</span><span class="s2">. Commit aborted."</span>
        <span class="nb">exit </span>1
    <span class="k">fi
done</span>
</code></pre></div></div>

<p>So, the full script appears as follows</p>

<div class="language-sh highlighter-rouge"><div class="highlight"><pre class="highlight"><code><span class="c">#!/bin/bash</span>

<span class="c"># Get the list of SQL files staged to be committed</span>
<span class="nv">sql_files</span><span class="o">=</span><span class="si">$(</span>git diff <span class="nt">--cached</span> <span class="nt">--name-only</span> <span class="nt">--diff-filter</span><span class="o">=</span>ACM | <span class="nb">grep</span> <span class="s1">'\.sql$'</span><span class="si">)</span>

<span class="c"># fix sql files with sqlfluff</span>
<span class="k">for </span>file <span class="k">in</span> <span class="nv">$sql_files</span>
<span class="k">do
    </span>sqlfluff fix  <span class="s2">"</span><span class="nv">$file</span><span class="s2">"</span>
<span class="k">done</span>

<span class="c"># stage modified files again</span>
git add <span class="nt">-u</span>

<span class="c"># Lint each sql file staged with sqlfluff</span>
<span class="k">for </span>file <span class="k">in</span> <span class="nv">$sql_files</span>
<span class="k">do
    </span>sqlfluff lint  <span class="s2">"</span><span class="nv">$file</span><span class="s2">"</span>
    <span class="k">if</span> <span class="o">[</span> <span class="nv">$?</span> <span class="nt">-ne</span> 0 <span class="o">]</span><span class="p">;</span> <span class="k">then
        </span><span class="nb">echo</span> <span class="s2">"sqlfluff found errors in </span><span class="nv">$file</span><span class="s2">. Commit aborted."</span>
        <span class="nb">exit </span>1
    <span class="k">fi
done</span>
</code></pre></div></div>

<h2 id="conclusion">Conclusion</h2>
<p><code class="language-plaintext highlighter-rouge">sqlfluff</code> is a package that can be used to format and lint sql code for many dialects for dbt. In this blog post, we discuss how to use <code class="language-plaintext highlighter-rouge">pre-commit</code> hooks of git to automatically format and lint sql codes.</p>]]></content><author><name>Janakiraman (Ram) Balachandran</name><email>ram@naavil.com</email></author><category term="Git" /><category term="Hooks" /><category term="Commit" /><category term="SQL" /><category term="sqlfluff" /><category term="Python" /><category term="Toml" /><summary type="html"><![CDATA[Git hooks are a simple, easy way to do small local scripting to improve code quality and readability. Using consistent git hooks across projects can reduce the load on CI/CD process which can focuse more on unit and integration testing.]]></summary></entry><entry><title type="html">Passing Local Environment Variables to Docker Build Process and Containers</title><link href="https://rambalachandran.github.io/blog/DockerPassLocalEnv/" rel="alternate" type="text/html" title="Passing Local Environment Variables to Docker Build Process and Containers" /><published>2022-07-24T00:00:00+09:30</published><updated>2022-07-24T00:00:00+09:30</updated><id>https://rambalachandran.github.io/blog/DockerPassLocalEnv</id><content type="html" xml:base="https://rambalachandran.github.io/blog/DockerPassLocalEnv/"><![CDATA[<p>Any data scientist or machine learning interested in developing production deployable models need to understand Docker. Docker is one of the most important tools for DevOps that can help to create and maintain a consistent enviroment across development, staging and production. In particular <code class="language-plaintext highlighter-rouge">docker-compose</code> can be used to configure and interface applications using multiple docker containers.</p>

<h2 id="passing-local-environment-variables">Passing local environment variables</h2>
<p>One of the challenges in using dockers is to pass local environment information to the docker. There are a couple of ways to do this.</p>

<ol>
  <li>Using the <code class="language-plaintext highlighter-rouge">.env</code> file in the same location as <code class="language-plaintext highlighter-rouge">docker-compose</code>. The variables provided in the <code class="language-plaintext highlighter-rouge">.env</code> file is used to expand the environment of the <code class="language-plaintext highlighter-rouge">docker-compose</code> command</li>
  <li>The <code class="language-plaintext highlighter-rouge">env_file</code> that is provided in the <code class="language-plaintext highlighter-rouge">docker-compose.yml</code> file. The variables provided in the <code class="language-plaintext highlighter-rouge">env_file</code> are injected into the environment of the containers.</li>
</ol>

<h2 id="postgresql-docker-example">Postgresql Docker Example</h2>
<p>To see the difference in action, lets work with an example of a postgresql docker container. The <code class="language-plaintext highlighter-rouge">docker-compose.yml</code> file for this is given below.</p>

<div class="language-yml highlighter-rouge"><div class="highlight"><pre class="highlight"><code><span class="na">version</span><span class="pi">:</span> <span class="s1">'</span><span class="s">3.8'</span>

<span class="na">services</span><span class="pi">:</span>
  <span class="na">postgres</span><span class="pi">:</span>
    <span class="na">container_name</span><span class="pi">:</span> <span class="s">postgres_container</span>
    <span class="na">image</span><span class="pi">:</span> <span class="s">postgres</span>
    <span class="na">environment</span><span class="pi">:</span>
      <span class="na">POSTGRES_USER</span><span class="pi">:</span> <span class="s">${POSTGRES_USER:-admin}</span>
      <span class="na">POSTGRES_PASSWORD</span><span class="pi">:</span> <span class="s">${POSTGRES_PASSWORD:-changemenow}</span>
      <span class="na">POSTGRES_DB</span><span class="pi">:</span> <span class="s">${POSTGRES_DB:-postgres}</span>
      <span class="na">PGDATA</span><span class="pi">:</span> <span class="s">/data/postgres</span>
    <span class="na">volumes</span><span class="pi">:</span>
      <span class="pi">-</span> <span class="s">/home/ram/data/docker_data/postgresql:/data/postgres</span>
    <span class="na">env_file</span><span class="pi">:</span> <span class="s">./config/postgres.env</span>
    <span class="na">ports</span><span class="pi">:</span>
      <span class="pi">-</span> <span class="s2">"</span><span class="s">5432:5432"</span>
    <span class="na">networks</span><span class="pi">:</span>
      <span class="pi">-</span> <span class="s">postgres</span>
    <span class="na">restart</span><span class="pi">:</span> <span class="s">unless-stopped</span>

<span class="na">networks</span><span class="pi">:</span>
  <span class="na">postgres</span><span class="pi">:</span>
    <span class="na">driver</span><span class="pi">:</span> <span class="s">bridge</span>
</code></pre></div></div>

<h2 id="passing-username-and-password-variables">Passing username and password variables</h2>
<p>In this configuration, the default values are provided for the database configurations. However these values can be over-ridden by passing environment variables. For example,
    - The databaser user is <code class="language-plaintext highlighter-rouge">admin</code>. However this value can be over-riden by passing the variable <code class="language-plaintext highlighter-rouge">POSTGRES_USER</code>. Similar over-rides can be done for password and database name.</p>

<p>Lets create two files <code class="language-plaintext highlighter-rouge">.env</code>  with the same following values</p>
<div class="language-sh highlighter-rouge"><div class="highlight"><pre class="highlight"><code><span class="nv">POSTGRES_USER</span><span class="o">=</span>admin2
<span class="nv">POSTGRES_PASSWORD</span><span class="o">=</span>dontchange
<span class="nv">POSTGRES_DB</span><span class="o">=</span>localpg
</code></pre></div></div>
<p>Now when we try to verify if the variable values are passed to docker-compose using the command</p>
<div class="language-sh highlighter-rouge"><div class="highlight"><pre class="highlight"><code><span class="nb">sudo </span>docker compose convert
</code></pre></div></div>
<p>we get the following output where the postgres variable values are correctly substituted.</p>

<div class="language-sh highlighter-rouge"><div class="highlight"><pre class="highlight"><code>services:
  postgres:
    container_name: postgres_container
    image: postgres
    environment:
      POSTGRES_USER: admin2
      POSTGRES_PASSWORD: dontchange
      POSTGRES_DB: localpg
      PGDATA: /data/postgres
    volumes:
      - /home/ram/data/docker_data/postgresql:/data/postgres
    env_file: ./config/postgres.env
    ports:
      - <span class="s2">"5432:5432"</span>
    networks:
      - postgres
    restart: unless-stopped

networks:
  postgres:
    driver: bridge
</code></pre></div></div>
<p>However, if we create a file  <code class="language-plaintext highlighter-rouge">./config/postgres.env</code> with the same values, these variables are not subsituted and we get the following values and we get the default values.</p>

<h2 id="passing-variable-to-container-environment">Passing variable to container environment</h2>
<p>Lets say we plan to create a custom folder in the container environment (<code class="language-plaintext highlighter-rouge">/data/customdir</code>), lets define it in <code class="language-plaintext highlighter-rouge">.env</code> file</p>
<div class="language-sh highlighter-rouge"><div class="highlight"><pre class="highlight"><code><span class="nv">CDIR</span><span class="o">=</span>/data/customdir<span class="sb">`</span>
</code></pre></div></div>
<p>Now if we start the container (<code class="language-plaintext highlighter-rouge">sudo docker compose up</code>) and try to find the variable in the container environment with following command</p>
<div class="language-sh highlighter-rouge"><div class="highlight"><pre class="highlight"><code><span class="nb">sudo </span>docker <span class="nb">exec</span> <span class="nt">-t</span> postgres_container <span class="nb">echo</span> <span class="nv">$CDIR</span>
</code></pre></div></div>
<p>the variable was not defined and we get an empty value returned. However when the same variable (<code class="language-plaintext highlighter-rouge">CDIR</code>) is defined through the file <code class="language-plaintext highlighter-rouge">./config/postgres.env</code>, the echo command in docker environment returns the expected value of /<code class="language-plaintext highlighter-rouge">data/customdir</code></p>

<h2 id="conclusion">Conclusion</h2>
<p>To pass a local environment variable to expand/build the <code class="language-plaintext highlighter-rouge">docker-compose.yml</code> file, we need to define the variable in the <code class="language-plaintext highlighter-rouge">.env</code> file. However, to pass the variable to the container environment, we can define it in any custom file (ex: <code class="language-plaintext highlighter-rouge">./config/postgres.env</code>), but this location needs to be provided under the <code class="language-plaintext highlighter-rouge">env_file</code> part of the yml file.</p>

<!---
# Multi Line  Equation in MathJax: https://stackoverflow.com/a/21565829/1652217
# How to make Mathjax work with jekyll: 
Copy _layouts/post.html to the working directory (You can get the path from `bundle info <theme-name>` which in this case is `minima`)
Copy the following scriptline into `post.html` and it should work off the box.

```
script src="https://cdn.mathjax.org/mathjax/latest/MathJax.js?config=TeX-AMS-MML_HTMLorMML" type="text/javascript"></script>
```


You’ll find this post in your `_posts` directory. Go ahead and edit it and re-build the site to see your changes. You can rebuild the site in many different ways, but the most common way is to run `jekyll serve`, which launches a web server and auto-regenerates your site when a file is updated.

Jekyll requires blog post files to be named according to the following format:

`YEAR-MONTH-DAY-title.MARKUP`

Where `YEAR` is a four-digit number, `MONTH` and `DAY` are both two-digit numbers, and `MARKUP` is the file extension representing the format used in the file. After that, include the necessary front matter. Take a look at the source for this post to get an idea about how it works.

Jekyll also offers powerful support for code snippets:


<figure class="highlight"><pre><code class="language-ruby" data-lang="ruby"><span class="k">def</span> <span class="nf">print_hi</span><span class="p">(</span><span class="nb">name</span><span class="p">)</span>
  <span class="nb">puts</span> <span class="s2">"Hi, </span><span class="si">#{</span><span class="nb">name</span><span class="si">}</span><span class="s2">"</span>
<span class="k">end</span>
<span class="n">print_hi</span><span class="p">(</span><span class="s1">'Tom'</span><span class="p">)</span>
<span class="c1">#=&gt; prints 'Hi, Tom' to STDOUT.</span></code></pre></figure>


Check out the [Jekyll docs][jekyll-docs] for more info on how to get the most out of Jekyll. File all bugs/feature requests at [Jekyll’s GitHub repo][jekyll-gh]. If you have questions, you can ask them on [Jekyll Talk][jekyll-talk].

[jekyll-docs]: https://jekyllrb.com/docs/home
[jekyll-gh]:   https://github.com/jekyll/jekyll
[jekyll-talk]: https://talk.jekyllrb.com/
--->]]></content><author><name>Janakiraman (Ram) Balachandran</name><email>ram@naavil.com</email></author><category term="DevOps" /><category term="Docker" /><summary type="html"><![CDATA[Any data scientist or machine learning interested in developing production deployable models need to understand Docker. Docker is one of the most important tools for DevOps that can help to create and maintain a consistent enviroment across development, staging and production. In particular docker-compose can be used to configure and interface applications using multiple docker containers.]]></summary></entry><entry><title type="html">Automate AWS EC2 Spot Instance Creation</title><link href="https://rambalachandran.github.io/blog/AWS_EC2_AutomateSpotInstance/" rel="alternate" type="text/html" title="Automate AWS EC2 Spot Instance Creation" /><published>2020-11-18T00:00:00+10:30</published><updated>2020-11-18T00:00:00+10:30</updated><id>https://rambalachandran.github.io/blog/AWS_EC2_AutomateSpotInstance</id><content type="html" xml:base="https://rambalachandran.github.io/blog/AWS_EC2_AutomateSpotInstance/"><![CDATA[<h2 id="automate-spot-instance-creation">Automate Spot Instance Creation</h2>
<p>One of the major pain points for me to work with AWS is the time that I need to spend every day trying to provision an EC2 Spot Instance. While, it is much cheaper to use Spot instance, it takes a lot of productive time going through the same routine every day.</p>

<p>While there are full fledged enterprise level IT automation tools like  <a href="https://docs.ansible.com/">ansible</a> which are more useful to handle systems in production, for individuals working on development and prototyping, this can be easily achieved using <code class="language-plaintext highlighter-rouge">boto3</code> package of python along with <code class="language-plaintext highlighter-rouge">crontab</code> in linux to automate this boring step.</p>

<h3 id="config-file">Config File</h3>
<p>The first step is to create a config file as shown below. Lets name it <code class="language-plaintext highlighter-rouge">config.cfg</code>. The file inputs are as follows.</p>
<pre><code class="language-apacheconf">[EC2]
ami=ami-0885b1f6bd170450c
key_pair=keypair_test
max_bid=0.01
instance_count=1
instance_run_type=one-time
instance_machine_type=t2.micro
instance_interrupt_type=terminate
instance_availability_zone=us-east-1f
security_group=sec_group1
iam_role=
subnet_id= 
tag=test-spot-instance
team=me
created_by=me
application=qa
product_description=Linux/UNIX
username=ubuntu
</code></pre>
<p>Let us go through the important options here.</p>
<ol>
  <li><code class="language-plaintext highlighter-rouge">ami</code> should contain the ami-id from which the instance needs to be provisioned. Here I have used the ami corresponding to Ubuntu 20.01.</li>
  <li><code class="language-plaintext highlighter-rouge">key_pair</code> is the name of the <code class="language-plaintext highlighter-rouge">.pem</code> file (<code class="language-plaintext highlighter-rouge">keypair_test.pem</code>) that will be used to tunnel into the virtual instances.</li>
  <li><code class="language-plaintext highlighter-rouge">max_bid</code> is the maximum value you are willing to pay for the instance. The higher the price, the less likely the spot instance to be terminated.</li>
  <li>Then you can specify various instance related information such as <code class="language-plaintext highlighter-rouge">instance_count</code>, <code class="language-plaintext highlighter-rouge">instance_run_type</code>, <code class="language-plaintext highlighter-rouge">instance_machine_type</code> and <code class="language-plaintext highlighter-rouge">instance_interrupt_type</code>. If required, you can also specify the zone where you need the instance.</li>
  <li>If you need to attach the instance to a specific security group, you can use the <code class="language-plaintext highlighter-rouge">security_group</code> where the value is the name of the security group. Similarly, we can include information of relevant <code class="language-plaintext highlighter-rouge">subnet_id</code> and <code class="language-plaintext highlighter-rouge">iam_role</code> if needed.</li>
  <li>The other information such as <code class="language-plaintext highlighter-rouge">tag</code>, <code class="language-plaintext highlighter-rouge">created_by</code> and <code class="language-plaintext highlighter-rouge">application</code> are tag values that are included to the EC2 resource tag.</li>
</ol>

<h3 id="python-code-to-create-ec2-instance">Python code to create EC2 instance</h3>
<p>The code that uses the config file to provision an EC2 spot instance is called <code class="language-plaintext highlighter-rouge">ec2_create.py</code> and is provided in this <a href="https://github.com/rambalachandran/pyAWS">github repository</a>. The repository also has sample config file (<code class="language-plaintext highlighter-rouge">config_sample.cfg</code>) that can be customized and used. The code can be run as follows</p>

<div class="language-sh highlighter-rouge"><div class="highlight"><pre class="highlight"><code>python ec2_create.py <span class="nt">--config</span> config.cfg
</code></pre></div></div>
<p>This will create the following output</p>
<div class="language-sh highlighter-rouge"><div class="highlight"><pre class="highlight"><code>Reading Config File
Spot instance request success, status: open
Waiting... None
Instance allocated ,Id:  &lt;ec2-id&gt;
</code></pre></div></div>
<p>Now this code can be easily scheduled for daily operation using <em>crontab</em>. This <a href="https://phoenixnap.com/kb/set-up-cron-job-linux">webpage</a> provides an excellent introduction to crontab. I prefer to collect all my crontab jobs into a single folder. So for this, I created a script <code class="language-plaintext highlighter-rouge">create_ec2.sh</code> with the following code</p>

<div class="language-sh highlighter-rouge"><div class="highlight"><pre class="highlight"><code>/path/to/python /path/to/ec2_create.py <span class="nt">--config</span> /path/to/config.cfg
</code></pre></div></div>
<p>Save the script in a common folder which in my case is <code class="language-plaintext highlighter-rouge">~/crontabJobs</code>. Make the script executable using the following command</p>

<div class="language-sh highlighter-rouge"><div class="highlight"><pre class="highlight"><code><span class="nb">chmod</span> +x ~/crontabJobs/create_ec2.sh
</code></pre></div></div>

<p>To edit crontab, type the following command</p>
<div class="language-sh highlighter-rouge"><div class="highlight"><pre class="highlight"><code>crontab <span class="nt">-e</span>
</code></pre></div></div>

<p>This opens the file for edit. If we need to provision the instance everyday of the month at 08:00AM we can simply add the following line</p>
<div class="language-sh highlighter-rouge"><div class="highlight"><pre class="highlight"><code>0 8 <span class="k">*</span> <span class="k">*</span> <span class="k">*</span> /home/username/crontabJobs/create_ec2.sh <span class="o">&gt;&gt;</span> /home/username/crontabJobs/cron.log 2&gt;&amp;1
</code></pre></div></div>
<p>where</p>
<ol>
  <li>first 0 indicates minutes,</li>
  <li>8 indicates hour of day,</li>
  <li>the next three stars indicate the day of the month, month of the year and day of week.</li>
</ol>

<p>If you do not have a local linux machine, you can keep a <em>t2.micro</em> instance running in AWS and perform all these tasks from that instance.</p>

<h2 id="conclusion">Conclusion</h2>
<p>The provisioning of EC2 spot instance that has lower cost can be automated using boto3 and crontab and save sometime from these boring tasks.</p>]]></content><author><name>Janakiraman (Ram) Balachandran</name><email>ram@naavil.com</email></author><category term="DevOps" /><category term="AWS" /><summary type="html"><![CDATA[Provisioning an EC2 spot instance by hand every day eats productive time. A small boto3 script plus crontab automates the whole routine.]]></summary></entry><entry><title type="html">Improving OCR Performance on Noisy Images</title><link href="https://rambalachandran.github.io/blog/OCR_NoisyImages/" rel="alternate" type="text/html" title="Improving OCR Performance on Noisy Images" /><published>2020-08-26T00:00:00+09:30</published><updated>2020-08-26T00:00:00+09:30</updated><id>https://rambalachandran.github.io/blog/OCR_NoisyImages</id><content type="html" xml:base="https://rambalachandran.github.io/blog/OCR_NoisyImages/"><![CDATA[<p>Extracting text from images using Optical Character Recognition (OCR) has enormous applications across almost all industries.  A robust, scalable OCR solution is an integral part to the digital transformation journey of every organization. These solutions can help an organization to obtain a significant edge over its competitors. For example, OCR solutions can</p>
<ol>
  <li>Help to reduce the time required in processing paper forms.</li>
  <li>They can digitize information from old important records that can be easily looked up for reference or can be analyzed to build insightful data models.</li>
  <li>Finally, OCR can be used along with images and videos to extract important textual information.</li>
</ol>

<p><a href="https://github.com/tesseract-ocr/tesseract">Tesseract</a> is one of the most important opensource OCR engines available today. At the time of writing this blog, Tesseract can extract text on more than 100 languages. The latest tesseract stable version (4.1.1) encompasses a prebuilt OCR engine built upon long short term memory (LSTM) based neural network models. These models can extract text in many real world datasets. However, in case of images that suffer from poor quality, extracting text with high accuracy requires improving image quality using advanced image processing algorithms.</p>

<p><a href="https://opencv.org/">OpenCV</a> is a great opensource tool that is built on C++ with python bindings that can help you develop and apply various advanced image processing algorithms. In the context of text extraction, some of the important image processing approaches include,</p>

<ol>
  <li>Correcting the text orientation (deskewing).</li>
  <li>Improve the character borders. This can be achieved by converting the image to grayscale and thresholding.</li>
  <li>Increasing the contrast of the image. This can typically be achieved by histogram equalization that converts a normal distribution of pixel intensities to uniform distribution.</li>
  <li>Denoising and smoothening of the images using interpolation algorithms.</li>
</ol>

<p>I have been working over the past few weeks on using OCR to extract text from images. In this article, I will restrict the discussion to denoising the images.</p>

<h3 id="machine-and-software-information">Machine and Software Information</h3>
<ol>
  <li>Local Machine: <em>Windows 10</em></li>
  <li>Tesseract Version: <em>v5.0.0-alpha.20200328</em></li>
  <li>Python Version: <em>3.7.3</em></li>
  <li>OpenCV Version: <em>4.3.0.36</em></li>
</ol>

<h3 id="handling-low-resolution-noisy-images">Handling Low Resolution Noisy Images</h3>
<p>Consider the following image from which text needs to be extracted</p>

<p><img src="/images/blog/ocr_noisy_input_image.png" alt="Input Noisy Image" /></p>

<p>Although, the image section has low resolution (15, 45) and is very noisy, a human eye can clearly see the number present as <em>166.3</em>.  This is possible, because we are able to interpolate the signal between the pixels. However, the prebuilt OCR models in tesseract is unable to perform this interpolation. For example, if we pass this image to <code class="language-plaintext highlighter-rouge">pytesseract</code> (the python bindings of tesseract) and use the following standard configs, it does not return any text.</p>

<div class="language-python highlighter-rouge"><div class="highlight"><pre class="highlight"><code><span class="n">pytesseract</span><span class="p">.</span><span class="n">pytesseract</span><span class="p">.</span><span class="n">tesseract_cmd</span> <span class="o">=</span> <span class="sa">r</span><span class="sh">"</span><span class="s">C:\Program Files\Tesseract-OCR\tesseract.exe</span><span class="sh">"</span>
<span class="n">custom_config</span> <span class="o">=</span> <span class="sa">r</span><span class="sh">'</span><span class="s">-c tessedit_char_whitelist=0123456789. --oem 3 --psm 6 outputbase digits</span><span class="sh">'</span>
<span class="nf">print</span><span class="p">(</span><span class="n">pytesseract</span><span class="p">.</span><span class="nf">image_to_string</span><span class="p">(</span><span class="n">img_bbox</span><span class="p">,</span> <span class="n">config</span><span class="o">=</span><span class="n">custom_config</span><span class="p">))</span>
</code></pre></div></div>
<p>One way to overcome this problem is to denoise and smoothen the image. We can accomplish this by resampling to improve the pixel density. The new pixel values are interpolated from existing signal values.</p>

<h3 id="mathematical-concepts-of-interpolation">Mathematical concepts of Interpolation</h3>
<p>This section discusses about the mathematical concepts of interpolation. If you are only interested in applications, feel free to skip this section. In most interpolations, to resample at new  we apply a discrete convolution operation on the input signal (here image pixels) with a kernel operator.</p>

\[S(x) = \sum_{i=-a}^{a}f(i)g(x-i)\]

<p>Where \(a\) is the region around the current signal point that determines the size of the kernel. There are various types of kernels used to perform such interpolations namely (i) box kernel, (ii) Gaussian kernel etc. However, one of the most important and effective kernels in providing a smooth interpolation of images is the <em>Lanczos kernel</em> \(L(x)\) which is defined as follows</p>

\[L(x) = \begin{cases}
 1  &amp; \text{if}\ x = 0, \\
 \dfrac{a \sin(\pi x) \sin(\pi x / a)}{\pi^2 x^2} &amp; \text{if}\ -a \leq x &lt; a \ \text{and}\ x \neq 0, \\
 0 &amp; \text{otherwise}.
\end{cases}\]

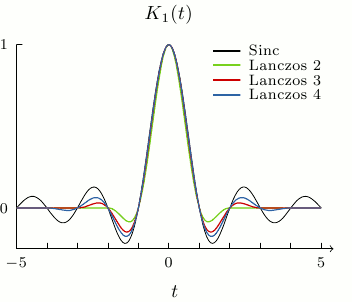
<p>The <em>a</em> value is a parameter that is a positive integer which determines the size of the Kernel. Restricting the Kernel size to a fixed constant value ensures that the interpolation operation is an \(O\)(N) operation, where N is the number of signal points to be sampled. The Lanczos kernel is built from the normalized \(sinc(x)\) function whose roots are the non-zero integers as shown below</p>

<p><img src="/images/blog/Lanczos_sinc.png" alt="Lanczos and Sinc Function" /></p>

<p>As you can see from the above image, the Lanczos kernel is smooth, continous and its magnitude dies of rapidly away from the origin. The discrete convolution of this kernel with the original signal (\(f(x)\)) data provides the new resampled/interpolated signal data (\(F(x)\)). In mathematical terms,</p>

\[F(x) = \sum_{i=-a}^{a}f(i)L(x-i)\]

<p>In case of multidimensional signal (2D signal as in case of images), the interpolated signal is obtained as pointwise multiplication of the kernel</p>

\[L(x,y) = L(x)L(y)\]

<h3 id="opencv-implementation">OpenCV Implementation</h3>
<p>In OpenCV, the Lanczos interpolation can be performed using the <code class="language-plaintext highlighter-rouge">cv2.resize()</code> function. Its python implementation is as follows</p>

<div class="language-python highlighter-rouge"><div class="highlight"><pre class="highlight"><code><span class="n">image_scale</span> <span class="o">=</span> <span class="n">cv2</span><span class="p">.</span><span class="nf">resize</span><span class="p">(</span>
                        <span class="n">image_input</span><span class="p">,</span>
                        <span class="n">dsize</span><span class="o">=</span><span class="p">(</span><span class="n">no_cols_output</span><span class="p">,</span> <span class="n">no_rows_input</span><span class="p">),</span>
                        <span class="n">interpolation</span><span class="o">=</span> <span class="n">cv2</span><span class="p">.</span><span class="n">INTER_LANCZOS4</span>                       
                           <span class="p">)</span>
</code></pre></div></div>
<p>where <code class="language-plaintext highlighter-rouge">dsize</code> is the size of the output image. In this function, the kernel size used is 8x8. We rescale the input image by a scale factor of 3. The interpolated smooth output image obtained is as follows.</p>

<p><img src="/images/blog/ocr_interpolated_output_image.png" alt="Interpolated Smooth Output Image" /></p>

<p>As we can observe the image pixel density has been increased 3x times and the numbers now appear smoother in this modified image. Now when we apply the OCR on this smoothened image, we get back the correct text value of <em>166.3</em>.</p>

<div class="language-python highlighter-rouge"><div class="highlight"><pre class="highlight"><code><span class="nf">print</span><span class="p">(</span><span class="n">pytesseract</span><span class="p">.</span><span class="nf">image_to_string</span><span class="p">(</span><span class="n">img_scale_bbox</span><span class="p">,</span> <span class="n">config</span><span class="o">=</span><span class="n">custom_config</span><span class="p">))</span>
<span class="c1"># This produces the following output
# 166.3
</span></code></pre></div></div>

<h3 id="conclusion">Conclusion</h3>
<p>In many scenarios, the real world datasets that we will come across are likely to have a wide range of issues. Poor resolution and noise is one of the most important among these problems. Using the appropriate interpolation to smoothen the image to improve its quality will help improve performance of OCR engines working on these images.</p>]]></content><author><name>Janakiraman (Ram) Balachandran</name><email>ram@naavil.com</email></author><category term="Computer Vision" /><summary type="html"><![CDATA[Extracting text from images using Optical Character Recognition (OCR) has enormous applications across almost all industries. A robust, scalable OCR solution is an integral part to the digital transformation journey of every organization. These solutions can help an organization to obtain a significant edge over its competitors. For example, OCR solutions can Help to reduce the time required in processing paper forms. They can digitize information from old important records that can be easily looked up for reference or can be analyzed to build insightful data models. Finally, OCR can be used along with images and videos to extract important textual information.]]></summary></entry><entry><title type="html">Using VS Code in Windows 10 for Remote Development in EC2</title><link href="https://rambalachandran.github.io/blog/VSCodeWithEC2/" rel="alternate" type="text/html" title="Using VS Code in Windows 10 for Remote Development in EC2" /><published>2020-08-23T00:00:00+09:30</published><updated>2020-08-23T00:00:00+09:30</updated><id>https://rambalachandran.github.io/blog/VSCodeWithEC2</id><content type="html" xml:base="https://rambalachandran.github.io/blog/VSCodeWithEC2/"><![CDATA[<p>I have used many IDE environments over the past years ranging from emacs, pycharm, eclipse among others. Emacs used to be my favorite editor since I was able to customize it to my needs. For example, one of the things I loved about Emacs was its seamless ability to work on code in remote servers through the <a href="https://www.gnu.org/software/emacs/manual/html_node/tramp/index.html#Top">Tramp</a> package. However, in a corporate career, you are mostly destined to work in local Windows environment and customizing Emacs to work with windows was becoming too much of a pain.</p>

<p>Recently, I switched over to Visual Studio Code (VS Code) which is slowly becoming my favourite IDE. It somehow strikes the perfect balance between working out of the box and customizability. Further, VS Code has strong interoperability across multiple languages.  I recently had to start remote development in EC2 and I was worried I might not be able to customize VS code to perform remote development. However, it turned out that VS Code provided the best framework for such remote development through <code class="language-plaintext highlighter-rouge">ssh</code>. I’m documenting here the steps I look to ensure a seamless access to EC2 through VS Code in Windows 10.</p>

<h3 id="machine-and-software-information">Machine and Software Information</h3>
<p>Local Machine: <em>Windows 10</em></p>

<p>Remote Machine: <em>Ubuntu 18.04 in AWS EC2</em></p>

<h3 id="steps-to-be-followed">Steps to be Followed</h3>
<ol>
  <li>First, you need to install the <a href="vscode:extension/ms-vscode-remote.remote-ssh">Remote-SSH</a> extension.</li>
  <li>For this extension, to work we will need an OpenSSH compatible SSH Client. Unfortunately, <em>PuTTY</em> does not satisfy this requirement and as a result we need to install <em>Windows OpenSSH Client</em>.</li>
  <li>
    <p>We can check if the client is installed in the local machine through the following windows power shell command.</p>

    <div class="language-powershell highlighter-rouge"><div class="highlight"><pre class="highlight"><code><span class="w"> </span><span class="n">Get-WindowsCapability</span><span class="w"> </span><span class="nt">-Online</span><span class="w"> </span><span class="o">|</span><span class="w"> </span><span class="nf">?</span><span class="w"> </span><span class="nx">Name</span><span class="w"> </span><span class="o">-like</span><span class="w"> </span><span class="s1">'OpenSSH*'</span><span class="w">
 </span><span class="c"># which should return output that appears something like</span><span class="w">

 </span><span class="n">Name</span><span class="w">  </span><span class="p">:</span><span class="w"> </span><span class="nx">OpenSSH.Client~~~~0.0.1.0</span><span class="w">
 </span><span class="n">State</span><span class="w"> </span><span class="p">:</span><span class="w"> </span><span class="nx">NotPresent</span><span class="w">
 </span><span class="n">Name</span><span class="w">  </span><span class="p">:</span><span class="w"> </span><span class="nx">OpenSSH.Server~~~~0.0.1.0</span><span class="w">
 </span><span class="n">State</span><span class="w"> </span><span class="p">:</span><span class="w"> </span><span class="nx">NotPresent</span><span class="w">
</span></code></pre></div>    </div>
  </li>
  <li>
    <p>If not present, we can install them using the following commands.</p>

    <div class="language-powershell highlighter-rouge"><div class="highlight"><pre class="highlight"><code><span class="w"> </span><span class="c"># Install the OpenSSH Client</span><span class="w">
 </span><span class="n">Add-WindowsCapability</span><span class="w"> </span><span class="nt">-Online</span><span class="w"> </span><span class="nt">-Name</span><span class="w"> </span><span class="nx">OpenSSH.Client~~~~0.0.1.0</span><span class="w">

 </span><span class="c"># Install the OpenSSH Server</span><span class="w">
 </span><span class="n">Add-WindowsCapability</span><span class="w"> </span><span class="nt">-Online</span><span class="w"> </span><span class="nt">-Name</span><span class="w"> </span><span class="nx">OpenSSH.Server~~~~0.0.1.0</span><span class="w">

 </span><span class="c"># Both of these should return output like:</span><span class="w">

 </span><span class="n">Path</span><span class="w">          </span><span class="p">:</span><span class="w">
 </span><span class="n">Online</span><span class="w">        </span><span class="p">:</span><span class="w"> </span><span class="nx">True</span><span class="w">
 </span><span class="n">RestartNeeded</span><span class="w"> </span><span class="p">:</span><span class="w"> </span><span class="nx">False</span><span class="w">
</span></code></pre></div>    </div>
  </li>
  <li>
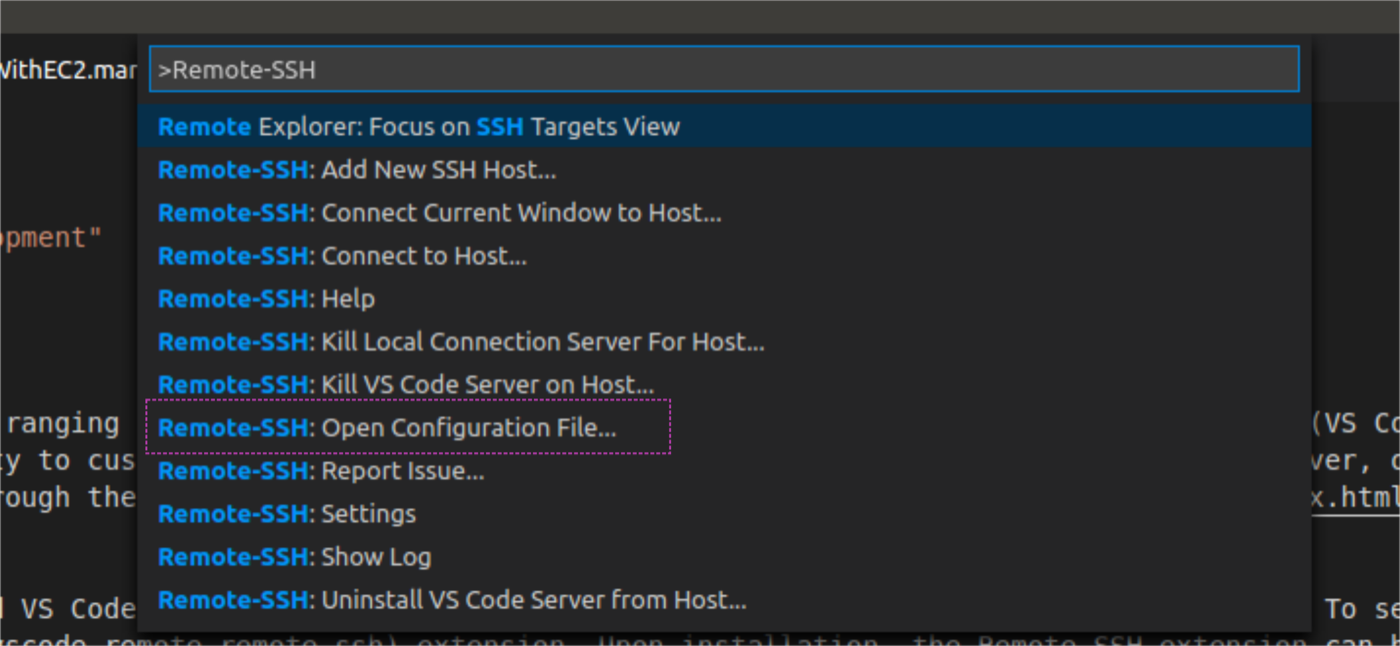
    <p>Now we need to configure the EC2 instance to be able to connect to it. From the command palette (which can be accessed through <code class="language-plaintext highlighter-rouge">F1</code> or <code class="language-plaintext highlighter-rouge">Ctrl+Shift+P</code>), select <code class="language-plaintext highlighter-rouge">Remote-SSH: Open Configuration File</code> as shown below.</p>

    <p><img src="/images/blog/remote_ssh_open_config.png" alt="Remote Open Config" /></p>
  </li>
  <li>
    <p>You need to access the ssh config file which is typically in <code class="language-plaintext highlighter-rouge">C:\Users\&lt;UserName&gt;\.ssh\config</code>. Add the following information to the config file.</p>

    <div class="language-ssh highlighter-rouge"><div class="highlight"><pre class="highlight"><code> <span class="k">Host</span> ec2-aws
     <span class="k">HostName</span> &lt;hostname&gt;
     <span class="k">User</span> ubuntu
     <span class="k">IdentityFile</span> `C:<span class="err">\</span>Users<span class="err">\</span>&lt;UserName&gt;<span class="err">\</span>aws_keys<span class="err">\</span>test-key-pair.pem
</code></pre></div>    </div>
    <p>The Host is a name you provide to identify the connection. The <code class="language-plaintext highlighter-rouge">&lt;hostname&gt;</code>is unique for an EC2 instance. This information can be obtained from browser based client or command line interface (CLI). Typically, I use an Ubuntu machine and connect to the machine with the username <code class="language-plaintext highlighter-rouge">Ubuntu</code>. An important thing to remember is that the <code class="language-plaintext highlighter-rouge">*.pem</code> file that is used to connect to the AWS needs to have restricted permissions. Without such restricted permission, VS Code will not be able to use it to connect to EC2. So, its best to place it within <code class="language-plaintext highlighter-rouge">C:\Users\&lt;UserName&gt;\</code> so it can derive restricted permissions.</p>
  </li>
  <li>
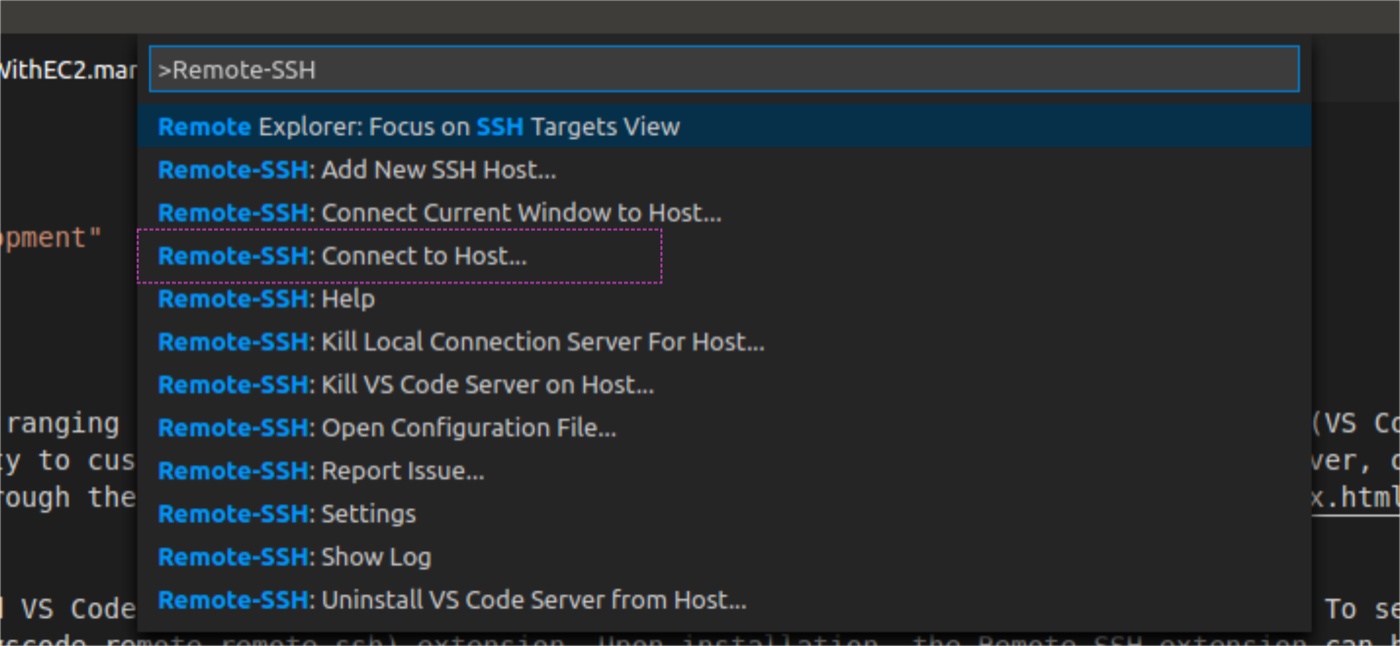
    <p>Upon configuration, we can connect to the EC2 instance through the <code class="language-plaintext highlighter-rouge">Remote-SSH: Connect to Host</code> as shown below</p>

    <p><img src="/images/blog/remote_ssh_connect_to_host.png" alt="Remote Host Connect" /></p>
  </li>
</ol>

<h3 id="conclusion">Conclusion</h3>
<p>It is also a good practice to idenity the type of Remote machine (which in my case is Linux), since I think VS Code does customization based on this information. Now VS Code will provide you access to all the files/folders remote machine which you can use to do seamless remote development.</p>

<!---
# Multi Line  Equation in MathJax: https://stackoverflow.com/a/21565829/1652217
# How to make Mathjax work with jekyll: 
Copy _layouts/post.html to the working directory (You can get the path from `bundle info <theme-name>` which in this case is `minima`)
Copy the following scriptline into `post.html` and it should work off the box.

```
script src="https://cdn.mathjax.org/mathjax/latest/MathJax.js?config=TeX-AMS-MML_HTMLorMML" type="text/javascript"></script>
```


You’ll find this post in your `_posts` directory. Go ahead and edit it and re-build the site to see your changes. You can rebuild the site in many different ways, but the most common way is to run `jekyll serve`, which launches a web server and auto-regenerates your site when a file is updated.

Jekyll requires blog post files to be named according to the following format:

`YEAR-MONTH-DAY-title.MARKUP`

Where `YEAR` is a four-digit number, `MONTH` and `DAY` are both two-digit numbers, and `MARKUP` is the file extension representing the format used in the file. After that, include the necessary front matter. Take a look at the source for this post to get an idea about how it works.

Jekyll also offers powerful support for code snippets:


<figure class="highlight"><pre><code class="language-ruby" data-lang="ruby"><span class="k">def</span> <span class="nf">print_hi</span><span class="p">(</span><span class="nb">name</span><span class="p">)</span>
  <span class="nb">puts</span> <span class="s2">"Hi, </span><span class="si">#{</span><span class="nb">name</span><span class="si">}</span><span class="s2">"</span>
<span class="k">end</span>
<span class="n">print_hi</span><span class="p">(</span><span class="s1">'Tom'</span><span class="p">)</span>
<span class="c1">#=&gt; prints 'Hi, Tom' to STDOUT.</span></code></pre></figure>


Check out the [Jekyll docs][jekyll-docs] for more info on how to get the most out of Jekyll. File all bugs/feature requests at [Jekyll’s GitHub repo][jekyll-gh]. If you have questions, you can ask them on [Jekyll Talk][jekyll-talk].

[jekyll-docs]: https://jekyllrb.com/docs/home
[jekyll-gh]:   https://github.com/jekyll/jekyll
[jekyll-talk]: https://talk.jekyllrb.com/
--->]]></content><author><name>Janakiraman (Ram) Balachandran</name><email>ram@naavil.com</email></author><category term="DevOps" /><summary type="html"><![CDATA[I have used many IDE environments over the past years ranging from emacs, pycharm, eclipse among others. Emacs used to be my favorite editor since I was able to customize it to my needs. For example, one of the things I loved about Emacs was its seamless ability to work on code in remote servers through the Tramp package. However, in a corporate career, you are mostly destined to work in local Windows environment and customizing Emacs to work with windows was becoming too much of a pain.]]></summary></entry></feed>